Showing posts with label DIY. Show all posts

Tuesday, September 4, 2012

Grandfather Clock Before&After!

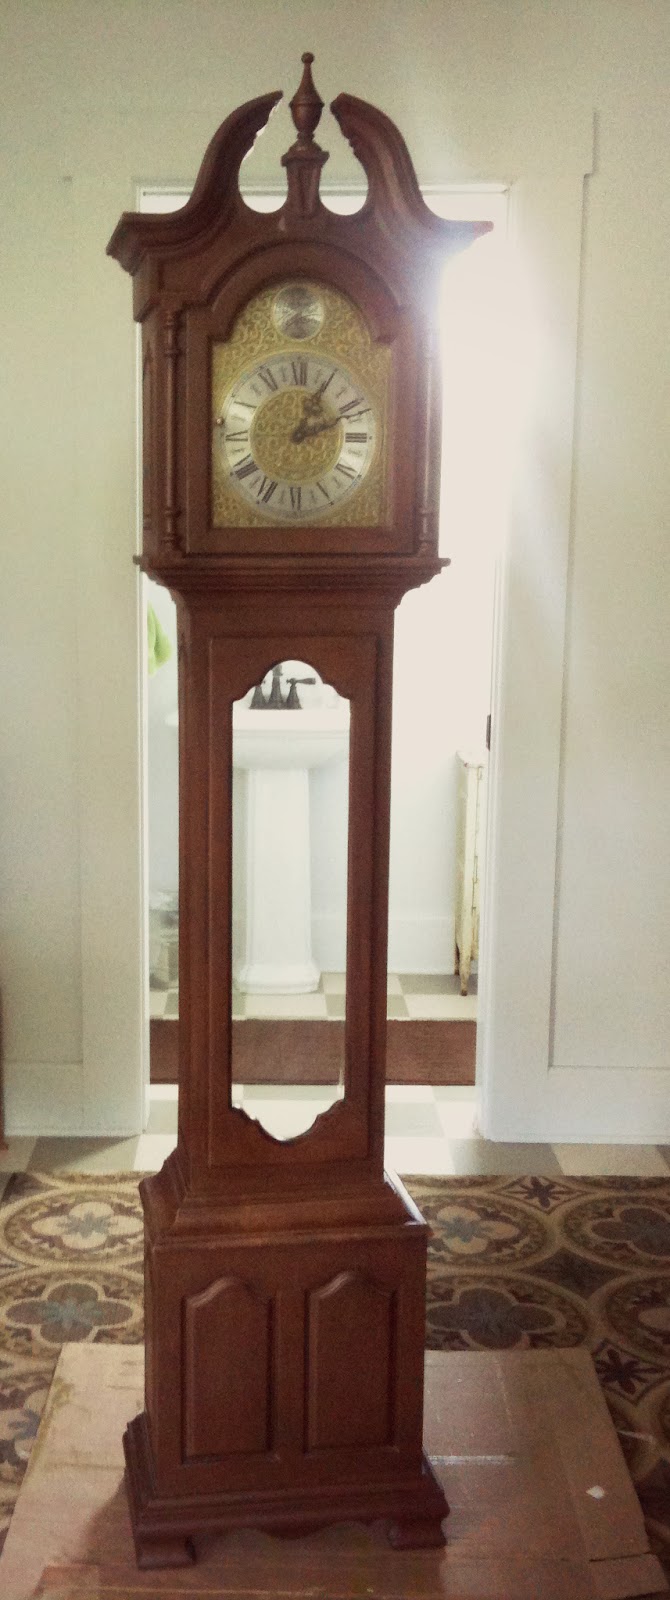
Remember that old grandfather clock that I had you help me choose a color for? Well he's painted and he's regal red! 

I was waffling between hot pink and red because I wanted something bold and totally unexpected. I've always wanted a grandfather clock but would never have the heart to paint a solid wood antique, so when I found this 70's relic in a heavy duty plastic material for $5.00 I totally jumped on it. I settled on red because simply because it's a more fitting color for our parlor. I used a high gloss red and then finished it with a dark wax to give it a little dimension. He's fully operational and has a delicate chime on the hour.

Tempus Fugit, latin for "Time Flies" 

and here's the before photo:
So what do you think? Do you love it, hate it, wish it was hot pink, wish I wouldn't have painted it?

Linking Up With Liz Marie Blog! 
Liz Marie Blog

Wednesday, July 11, 2012

DIY Apothecary Drawers

I showed you a desk that I gave new life to earlier this week. Remember I removed the drawers from it? Well If you're wondering what happened to those drawers, you're in the right place to find out. 

Apothecary drawers are trending big right now, and I admittedly share the sentiment that they are just awesome! I love having empty drawers around to file papers in, house the kids' coloring books, or keep office supplies in. They have gobs more character than plastic baskets, and if you don't have extra room in your closet, drawers will add a little charm to your house. 

I decided to remove the drawers from the desk and repurpose them as storage containers. The original knobs were plain circular wood and blended into the drawer. I actually really like the natural wood look of the drawers and wanted to achieve that apothecary drawer style so I didn't paint but looked around for a hardware replacement instead. I found some FAB card holder bin pulls and knew what had to be done. 

I love the simplicity and old world charm that these drawers have ... the card pulls are amazing and all have unique and gorgeous patina. 
This is an extremely simple DIY that has a really cool result .. try it! 


Tuesday, July 10, 2012

Frames: From New to Old in an Hour!

I usually like to rescue furniture that is covered in dust and bugs, that seems to have no chance of life in this world unless I bring it home with me. It gives me that feel good vibe. However, every now and then, when I'm on an obligatory trip to Walmart, I pass through the clearance rack and find something that I can save. I have to assume that most things dislike the Walmart Clearance rack just as much as they would dislike being covered in spider eggs. 

Frames are one of those things I always have my eye out for. I love buying new frames because they are always in good shape and I don't have to put a lot of extra work into actually framing my pieces. The drawback, of course, is that new frames are boring, and sometimes ugly. I found these three frames at Walmart, on clearance for $10.00 a piece. They came with glass, backing and a matte cut to 8x10. In the frame world, that's a steal. 


I've been dying to try the Annie Sloan crackle method. The story goes that you can use any Annie Sloan paint, use a hair dryer right after applying the paint and it will naturally crackle. I was intrigued and thought these frames, being small, would be the perfect thing to try this technique on.  
 By the third frame I got the technique down and actually was able to get the entire frame to crackle lightly. I can't say enough how easy this paint is to distress and how fast it dries. I completed this entire project and had the freshly painted frames hanging on the wall within an hour. That's the sort of turn around time I need more of in my life! 
I think these frames turned out really cool and I'm excited to frame some of my photographs of the prairie in them. 

Monday, July 9, 2012

Desk: Before and After!

I'm starting this week off with a bang. I know last week must have been awfully rough for all of you because of my blogging hiatus ;) but I'm back in full force! 

I finally caved and bought some Annie Sloan Chalk Paint, and Wax. I resisted for a long time on this paint trend, mainly because I'm cheap ... and Annie isn't. I started with a couple of sample pots and a can of dark wax, and my first project was this desk. 

I found the desk at a second hand store and was immediately drawn to it because of it's unique design. It's solid wood and has tons of charming little imperfections. Despite the fact that it was only $17.50, I passed it up, fearing that it would sit in my garage for the next three months untouched. The next day I was daydreaming about it and envisioned what it could be, I immediately packed up the kids and went to get it .. and I'm very happy that I did. 

Here's the before, the drawers I had taken out and you can see in the photo, the desk was gross, covered in bugs and bug nests and very dark and scary on the inside. 

Tada! I decided to do an open shelving look on this desk because I had a different idea for the drawers (which is a story for another post). I sanded down the top and coated it with a delicious honey oak minwax stain which brought out the red hues. I painted the desk inside and out with a nice satin cream (not Annie Sloan) and the front I painted yellow (not Annie Sloan either). I hated it, so when I got my Annie Sloan green sample pot I slapped it on over the yellow, rubbed on the dark wax and did some distressing. I'm totally digging how it turned out, and I love this shade of green. 
So far I'm happy with the Annie Sloan product. I really liked the way the paint went on, and it dries incredibly fast. I LOVE the wax, and I was able to use the wax on other brands of paint, so I'm definitely sold on that product. We'll see how long I can resist buying more of this stuff :) 
What do you think? 


Tuesday, June 26, 2012

Letterpress Drawers

I have a new mad obsession with going to flea markets. We pack up the kids, the double stroller, enough food to feed an army of children (which our two kids seem to consume without any trouble), tons of water, and of course sun screen.

Let me clarify that when I say we go to flea markets I mean that we've gone to the 3rd Sunday Market twice. It's a big deal for us. It drains our energy completely until the next month. This month the letterpress drawers were speaking to me. I bought two in similar size in depth they were both under $10.00. This isn't a revolutionary idea or anything, but I am so stoked on how these drawers charmed up our living room, I had to share! 

So here they are looking gross and grimey. I sprayed them off with the hose and let them dry in the hot hot sun. 

Dirty, but they have little markings all over them and I love that character! 
I drilled them into the wall side by side, easy, cheap and totally beautiful. 
So, If you've been thinking about getting a letterpress drawer or two, I say do it!


Thursday, June 21, 2012

Mod Table - Quick Look

I'm totally kicking myself for not taking a before picture of this table. It was almost black when I got it, and covered in a very thick layer of dusk. I had originally planned to paint the entire table, but once I got it cleaned and the legs and bottom painted, I could see a glimmer of the wood under the original dark stain. I sanded down the top and used a red tinted minwax to bring it back to life. I love how mod it turned out, so I wanted to share a quick photo with you! 


Monday, June 18, 2012

DIY Hook Board AND Giveaway!!

Hello! I am staying at home all week working on painting, building, and craft projects for LRC. I am pumped to have a week at home to play catch up on some project. I'm pretty sure our neighbors think I am a straight up hoarder when they drive by and we have our garage door open. 

I have a special little project to share with you today. Last week I realized that in order to finish the storefront on my art space I needed to salvage a couple more boards. After climbing into the barn loft and stepping over a giant dead bird carcass, in my flip flops, that BROKE when I was up there, I decided that I may as well bring home a few extra boards so I wouldn't have to visit the barn loft for a little while. A couple of robin egg blue, chippy, barn boards had me so excited this weekend that I hurried to hobby lobby for a few hooks and whipped up a little hook board. 


Materials: 
Barn Board or Scrap wood
Circular Saw
Drill
Hooks or Knobs 
Hack Saw
Picture Hangers

How To: Once you have the barn board or scrap wood that you want to use, you may need to cut it to the desired length. Length is a personal preference, I cut mine to about 24 inches using a circular saw. Remember SAFETY FIRST. Once your board is cut you can drill holes in your board with a drill bit that is slightly smaller than your knob screws. You will want to measure before drilling, take into account the size of your knobs and how you want them to look on the board. Drill your holes and screw in your knobs. Use a hack saw to saw off any excess screw. Tighten your bolts with a wrench and finish the back with two picture hangers. 


So now on to the exciting news, Litte Red Chair reached 30 blogger followers yesterday, yahoo! I know it might seem a little pathetic, but It's a milestone none the less! So to honor this momentous milestone ;) I am hosting a giveaway! This very hook board will be finding a home with one of you this week. 

All you need to do to be entered into the drawing is leave a comment on this post before this Friday (6.22.12). On Friday I will randomly draw a name, announce the winner, and send the hook board off to it's new home! PS: if you comment "anonymously" I won't have anyway to get in touch with you, so check back on Friday to see if you're the winner! 

Don't be shy! Tell your friends, and COMMENT! Also, you get brownie points if you're a follower, so click the "join this site" button in the left margin :D oh yeah and, COMMENT! 

Good Luck! 

Thursday, June 14, 2012

Little Rocker: before and after!

Rock on, in a hot pink rocker. 

 I picked this rocker up for $5.00 at the ReStore. At the time I really debated on whether or not to get it because I knew it would be a chore fitting it into my car ... All of the stuff above was in the back of my Subaru simultaneously... so you can understand my concern. Alas, it was too good to pass up, she sits low to the ground, rocks like a dream, and has a classic high back ... I also love the clean lines and primitive look. 

Enough from me, Have a lovely Thursday evening! 


Wednesday, June 13, 2012

Old School Chair: Before and After

Hello! I have been dying to do a before and after post, but in order to do one I actually need to have done the work. So I finally got serious about finishing up some of these projects that I showed you a month or so ago. Today we're looking at the before and after for the school chair. I finally found a little inspiration and got to work. 
after: 
I had a desire to leave the desk untouched, because it already had so much character, which is one of the reasons why it took me so long to figure out how I wanted to execute. I ended up painting the seat and back cream. I distressed the seat heavily and covered (mod podged) the back with old dictionary clippings. The dictionary clippings are inspired by science ... a subject that I hated in school but seem to be fascinated with now. 
The back of the chair says: Property University Of Illinois Physical Plant. The desk has astrological signs, doodles, and cries for help inscribed on it. 
That's all folks, simple before and after! Stay tuned tomorrow for a redo on the rocker! 

Monday, April 30, 2012

Pretty Little Yellow Hutch Makeover!

Another hutch is finished! I have taken a very serious vow not to take on a project of this size for awhile ... so much work! As I've shared before, I picked up a table, wash basin, two hutches, and a bunch of chicken wire for $60.00 when I followed a Craigslist posting to Clinton IL one morning. I have now finished all three repair projects and am feeling really awesome about it! Mostly because everything was SO dirty, it nearly killed me to clean, disinfect, and sand these finds, but the end result is totally worth it. 
 This piece in particular was filthy, and what's worse, it was covered in water damage. 
 And there was a hole in the back! 
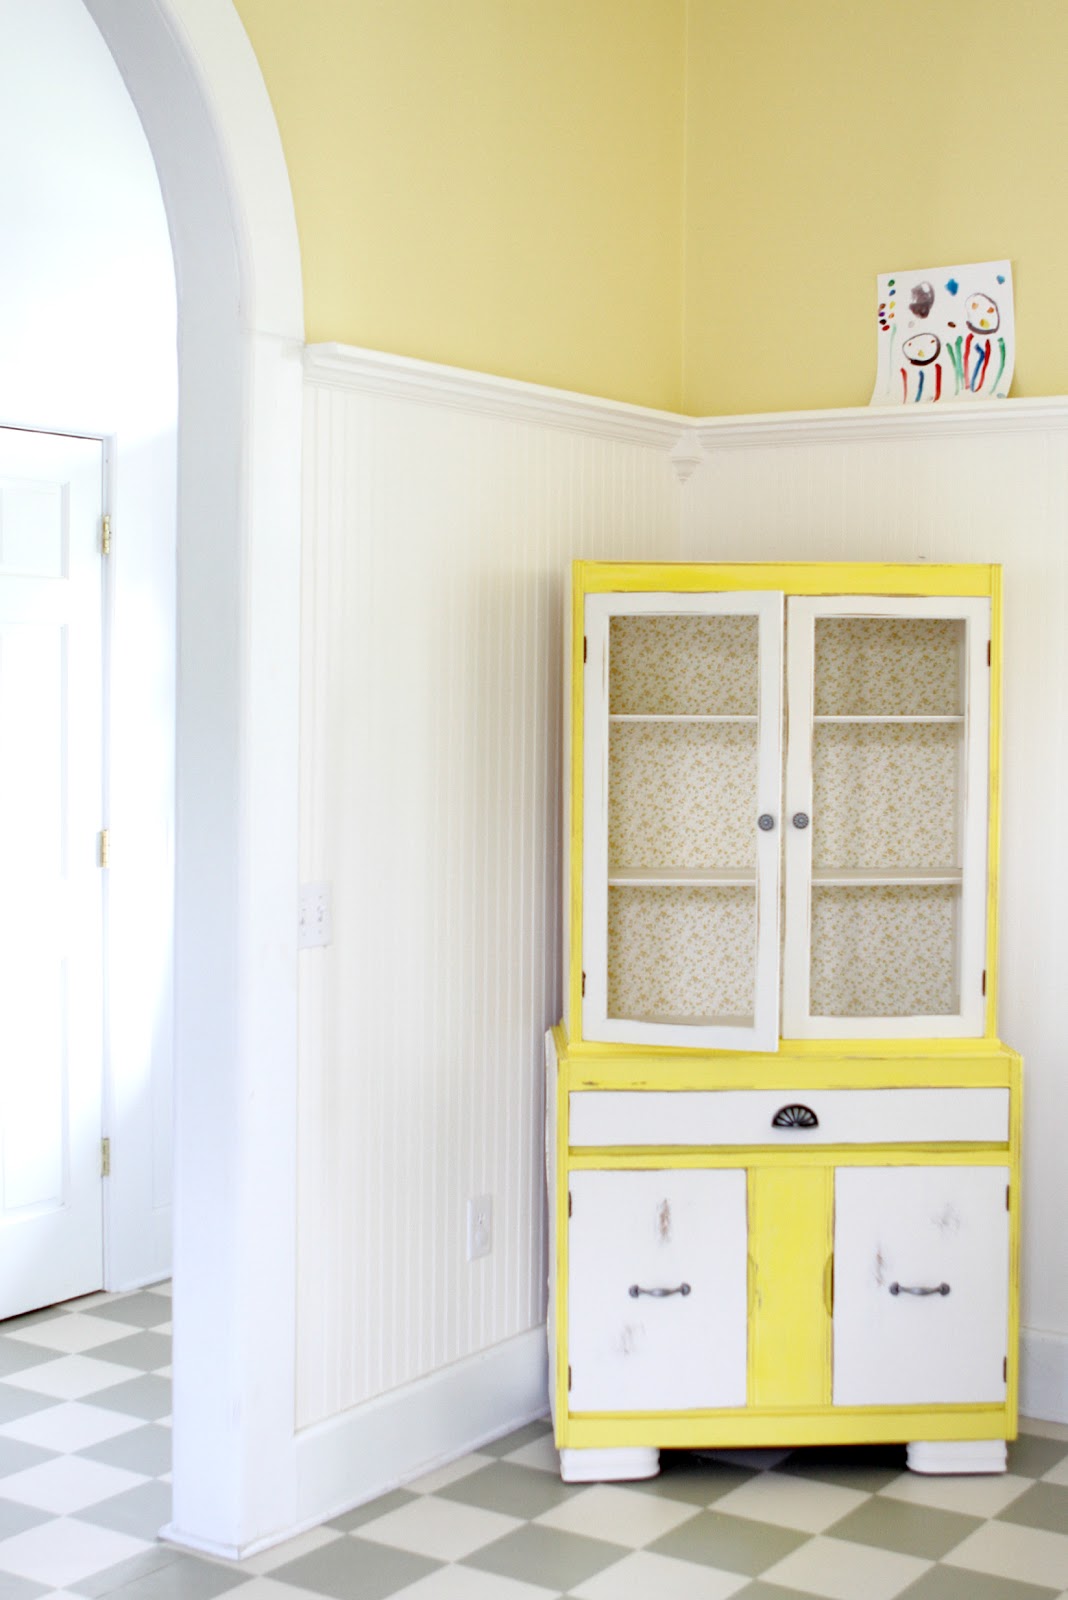
 After some major time spent cleaning, sanding, and filling water damaged areas, I primed and painted the entire cabinet in a soft white. I painted the front facing part of the cabinet yellow, and then painted the doors in the same soft white as the rest of the cabinet. 
 I decided to distress this piece after the multiple heart attacks I had trying to keep the last hutch's paint from chipping ... distressing can sometimes  make your life easier, and I thought it was fitting to the vintage color and style of the piece. 
 I had to remove the original back from this piece because of the hole (seen above), which actually made painting it WAY easier. I had Home Depot cut ply wood for a new back and I then used vintage (vinyl) wallpaper to cover it. New, matching knobs and pulls from Menards that also contribute to the granny fabulous look. 


Tada! Thanks for stopping by! I will be posting at least one more furniture makeover this week, so don't stay away too long!


Linking up to:


Wednesday, April 18, 2012

DIY Business Cards

Business Cards. I no longer buy them in bulk. Things change so quickly that I can never seem to get through 100 business cards before something changes and I need a new set. I much prefer making business cards for specific events, promotions, or seasons. 

I created about 20 business cards for last week's opening of the Dark Tranquility photography show. It was fun to do a business card in the theme of my photography. I used a really simple method and every card is unique and fitting to my work on Dark Tranquility. 


I bought standard artist cards at Hobby Lobby. They are blank cards that come in a variety of styles/materials. I used extra lace that I had incorporated into the show and itty bitty clothes pins that I already had (I bought mine a year or so ago at Joannes, but I've seen them in other craft stores). I also used a stamp set from the Martha Stewart line at Michaels which I LOVE and use all the time. I highly recommend buying a stamp set that allows you to create your own stamps. 


I decided glue was too messy to deal with and wanted to have a layered feminine look, so I used the clothes pin to clip the lace to the front and a link list to the back. The actual card has my name stamped to the front, and my email stamped to the back. 


I really loved doing this and am excited to make some more cards for little red chair and for my client photography. I will show you what I come up with! 

If you decide to make some homemade cards, please share! 

xo, chelsea